- Cello Parts Guide - December 9, 2021
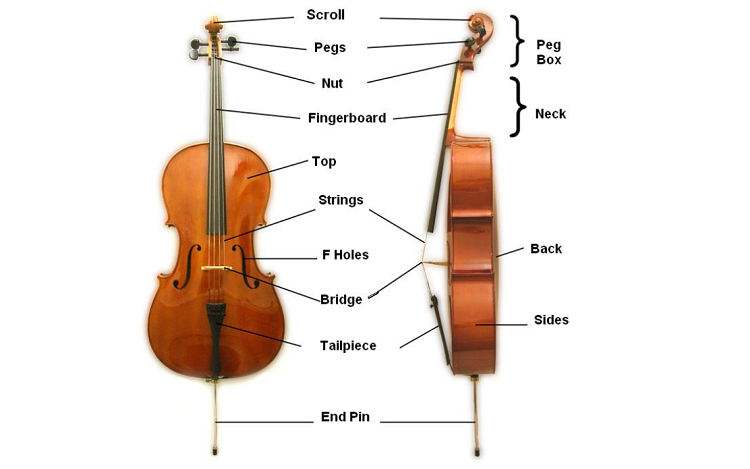
Whether you’re trying to judge the quality of a particular cello, discover more about its origins, or pinpoint a problem with your instrument, understanding the different parts of the third-largest member of the string family is essential for every player. We can see most elements like the body, fingerboard, scroll, strings, etc., and understand their purpose without any particular expertise. However, being familiar with the little-known parts of the cello and some key details can allow a cellist to feel at ease in any situation. The cello’s parts fall naturally into four categories:
- The surface of the body
- Inside the body
- The neck, pegbox, and scroll
- The setup
The Surface of the Body
Much of the quality of a cello depends on the materials, construction, and shape. Modern cellos are based on the precise measurements of old masters, particularly Antonio Stradivari. The cello’s body is similar to the other instruments in the string family: the violin, viola, and double bass. The curved, top section of the cello is the upper bout, and the bottom section, the lower bout. The middle concave part is called the waist. Varnish coats the surface of the cello, which prevents the wood from deteriorating over time. Almost all cello makers are very secretive about their exact varnish recipe. Much of the Stradivari genius is attributed to the varnish ingredients; more than 300 years later, these string instruments are considered the best in the world. The cello’s surface consists of:
- The top (soundboard)
- The back
- The sides
- F-holes
- Purfling
Top (Soundboard)
 The cello top is usually made of spruce, a softer wood than the maple used for the rest of the body. The softness allows for greater absorption of the vibrations created by bowing across the strings. The top, also known as the top plate, transfers these vibrations through the soundpost inside the cello. They then bounce off the inside back and are pushed through the f-holes. The top is slightly thicker in the centre around the f-holes.
Caring for the Cello’s Top
Setup features like the bridge, strings, and tailpiece are installed on the cello’s top. Therefore, the cello should also be kept in its case or on its side. Never place the cello facing downwards. The area between the bridge and fingerboard needs to be wiped clean from rosin every time you finish playing. Over time, rosin dust seeps into the varnish and wears it down. Be careful about attaching microphones to the cello’s top. If you’re playing in a recording studio or big live event, it is quite likely a sound engineer will arrive in a hurry to fasten a microphone to your instrument! I once damaged my violin like this. Someone attached a microphone to the left-hand waist via a stand that tightened onto the back and top. When they removed it, there was a small dent in the varnish.
Back
The back of the cello (also known as the back-plate) is most commonly made from flamed maple, a particularly resonant wood. If your cello has horizontal flame-shapes across the back, this is the case. It is a single, hand-carved piece of wood; however, some cheap instruments are made of laminated wood and machine-produced instead of carved. The thickness of the back is tapered; the centre is doubly as thick as the edges. Some of the finest old instruments by Stradivari, Guarneri and Rugeri have poplar or willow backs.
Sides
 The sides or ribs of a cello are very thin pieces of maple wood that connect the top and back, creating the resonant soundbox of the body. They are constructed using plywood forms, on which the maple is heated and molded around. It is easy to damage the cello’s ribs as they are fragile, and cellos are often placed on their sides. Miscalculated bow strokes can hit the upper part of the left rib. If you see any crack or gouge on the cello’s surface, take it immediately to a cello maker for reparation.
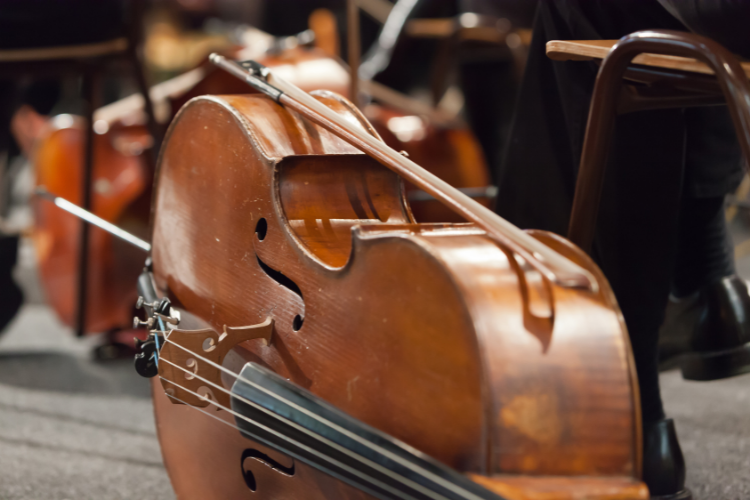
F-holes
We hear the sound from the two identical f-holes on the cello’s top. Before the great Italian makers, f-holes varied in shape and were sometimes circular or c-shaped. Once the Cremonese instruments became the basis for all stringed instrument construction, the ‘f’ shape they favored became the norm. Aesthetically, the shape of the ‘f’ reflects the curve of the cello nicely. These two holes provide access to the inside of the cello, which is necessary to make adjustments to the sound post. The natural humidity of the cello’s inside causes rosin dust and dirt that falls through the f-holes to stick together. You might find a ‘ball’ at one point, rolling around the inside of the instrument. If this happens, carefully turn the cello over and try to get the ball to roll over an f-hole from which you can extract it.
Purfling
Purfling is an inlay of wood that runs around the cello’s entire top (and sometimes back). As the edges of the instrument are the most fragile and likely to crack with temperature changes, purfling has a binding effect and adds extra strength. It also provides a decorative border, highlighting the curves. Some cheap cellos will only have purfling painted on – this is relatively easy to see. Purfling consists of three delicate strips of wood, layered into a thin channel that is carved into the cello edge. Traditionally, the outer two strips are dyed-back pearwood, and the inner strip is poplar. Dutch makers used whalebone for the inner strip, which made the instrument gleam softly. As mentioned above, it is easy to miscalculate a bow stroke and hit the edge of the cello’s waist with the heel of the bow. If this happens, it is probably the purfling that you will damage. Any irregularities or chips in the black border should prompt you to get your instrument checked by a professional.
Inside the Body
 Unlike humans, a cello’s body contains almost nothing. It is in itself a soundbox, a semi-enclosed space in which vibrations are pushed through air. When the vibrations exit the soundbox, they resonate further. There are only two elements in the body/soundbox: the bass bar and the soundpost. Both of these are fundamental to the sound. If there is a problem with either one, the cello might have a distorted and muffled sound, even if it is a high-quality instrument. Analyzing the bass bar and sound post is difficult as they are almost invisible. By holding the cello horizontally and peering through the f-holes, you might get a glimpse of them. If the sound of your cello suddenly changes or worsens, the sound post has likely moved, or the bass bar unstuck. You must see a cello maker if this happens, but don’t worry too much as both pieces are separate and replaceable.
Bass Bar
The bass bar is a long piece of spruce wood glued to the inside of the cello’s top. When the fingerboard, bridge, and strings are mounted, approximately 38.5 kg of pressure bears down on the top! The bass bar prevents the top from collapsing under this force and distributes the weight along the top’s length. The bass bar was the same piece as the top in some old cellos. It did not have to be as strong as it does now, as gut strings resulted in less tension when the cello sound was smaller and more intimate. Bass bars are always separate pieces nowadays and are significantly more robust. The exact positioning is relative to the bridge. The bass bar must be placed under the left foot of the bridge, mirroring the soundpost under the right foot.
Soundpost
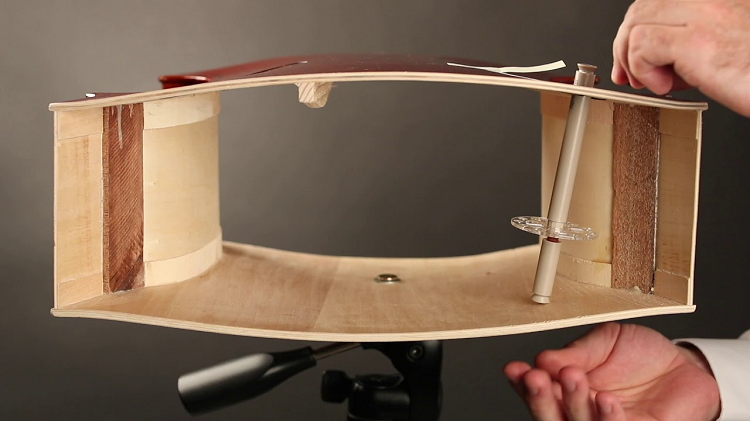 The soundpost is a cylindrical piece of wood that transfers vibrations from the top to the back of the cello. It is held in place purely by the tension of the setup and friction of the wood grain. The slightest of movements can change the sound of the instrument dramatically. When the post is closer to the bridge, the sound becomes brighter and more direct. Further from the bridge, the sound softens and darkens. The length and quality of the post are also crucial. The entirety of the post faces must be in contact with the cello surfaces, and while the fit must be tight, it should not exert an upwards pressure on the cello top, or the sound can seem choked.
Neck, Pegbox, and Scroll
The neck, pegbox, and scroll are generally carved from the same piece of maple wood. Varnish is not applied in the same way to the neck as it is to the body and scroll as the player’s thumb would eventually rub it off. It looks less brilliant than the other parts.
Neck
The neck is the long wooden piece that extends upwards from the cello’s body to the pegbox. The fingerboard is glued onto the neck. At the bottom of the neck is a curve that fits the body’s width, known as the tongue. A groove is cut into the top of the cello rib. The tongue is then inserted and fixed with glue. You can sometimes tell how old an instrument is by a ‘scar’ on the top of the neck. Around 1840, it became commonplace to have a longer neck. Before long, cello repertoire and technique rendered it essential. The scrolls of instruments made before the early 1800s were removed from the short necks and grafted onto new, longer ones. This reparation left a visible mark on the instruments. You must look closely at this because some fake-old instruments have an aesthetic neck graft drawn on.
Pegbox
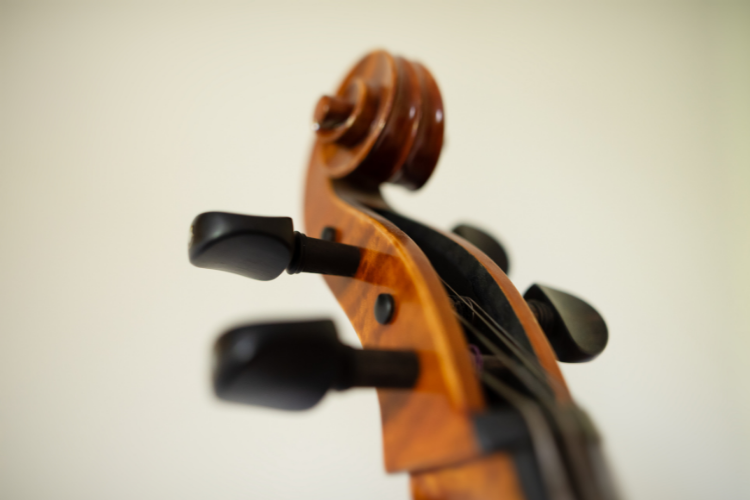 The pegbox is found at the top of the neck. There are four holes on each side of the pegbox. Two pegs are inserted into either side, and their ends slightly protrude from the opposite side. Changes in humidity can cause the peg holes to enlarge or shrink, affecting the pegs’ ease of turning. If the pegs get stuck, the environment is too humid. Keeping the cello in an air-conditioned environment should enlarge the peg holes. Some old instruments have bushed pegboxes, which are peg holes partially filled with wood. Over time and heavy usage, the pegs eventually wore down the wood of the pegbox resulting in enlarged holes.
Scroll
The scroll is a purely ornamental feature of the cello. It can be a clear indicator of an instrument’s origins and worth. Typically a rolled-up spiral shape, some luthiers made their scrolls as intricate as possible to portray their skill. When tuning or stringing a cello, it is useful to hold the scroll for stability.
Setup
The setup consists of the replaceable features of a cello. Very few of these are old – they wear down (or break) over time. How long they last depends on how much you play and how to what extent your cello is exposed to different environments. Setups vary depending on the cellos themselves and the player’s preferences. There is no ‘perfect’ fingerboard or strings that will suit everyone. The dimensions of some features are inter-related, like the curve of the nut, fingerboard, and bridge. Most problems that players encounter relate to the setup. Strings set too high/low, a tailpiece that create a buzz, a wobbly bridge… it’s important to be able to identify these problems and explain them clearly to a cello maker.
Fingerboard
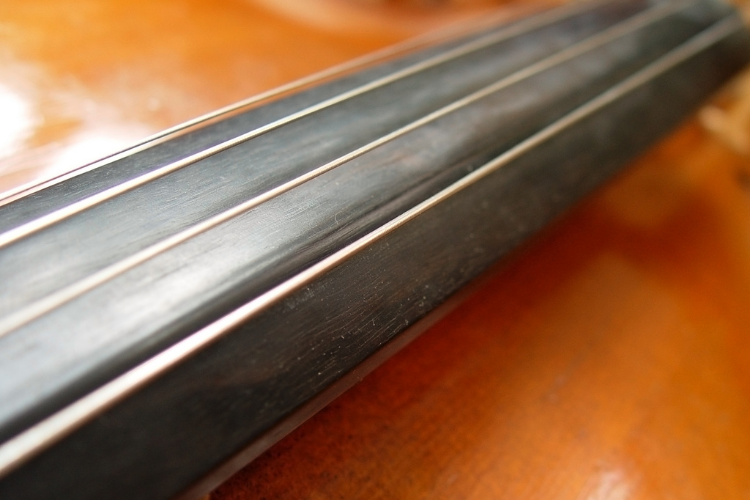 The fingerboard is the long, dark wooden piece stuck onto the cello’s neck. Made of ebony, it can withstand the constant pressing of the left-hand fingers. The fingerboard is slightly curved and angled backwards so that each string can be played individually. When the finger presses down on the string, the rest of it (between the finger and tailpiece) vibrates in the air. The width of the fingerboard must match that of the bridge. As consistent playing will slowly wear the board down (over many years), you might have to adjust the bridge’s size or replace the fingerboard at one point.
Caring for Your Fingerboard
Metallic strings and sharp fingernails can cause grooves in the fingerboard, creating a buzz. Regularly wipe the fingerboard clean with a soft cloth, pulling it under the strings and up towards the scroll.
Nut
The nut is a small strip of wood attached to the end of the fingerboard nearest the pegbox. It keeps the strings suspended above the fingerboard. Four slight grooves are etched into the nut, so the strings stay in place.
Caring for the Nut
You can draw a few lines with a sharp lead pencil in each groove whenever you change your strings. The lead will act as a cushion and prevent the string from getting embedded in the groove or potentially breaking. Rosin dust, sweat, and grime can accumulate in the nut’s grooves. Regularly wipe it clean with a soft cloth.
Pegs
 Four tuning pegs fit into the pegbox. Each cello string is threaded through a small hole in each peg and then wound around it. You loosen or tighten the string by turning a peg, altering the pitch. Cello pegs are usually made of ebony and should turn smoothly in the pegbox hole. The peg should be pushed with moderate force when turned to prevent slipping. The invention of geared pegs has taken off in recent years, and many cellists find them much easier to tune with. Small-toothed gears are hidden in the head of each peg, which means the peg can be turned with less force. A larger turning motion is required to make a slight adjustment.
Caring for Your Pegs
You should turn the pegs frequently to prevent changes in humidity and temperature from affecting them. Pegs can get stuck if humidity levels rise and shrink if they fall. You can rub chalk on the pegs to increase grip, while soap or peg paste acts as a lubricant.
Bridge
The bridge is a slender, arched piece of maple that carries the tension of the four strings. It transmits their vibrations to the cello body. Four grooves, one for each string, are etched into the top of the bridge to hold the strings in place. The bridge is anchored by the downward force of the string tension – there is no groove on the cello top for the bridge, neither is it glued down. Therefore, it is essential that the bridge is fitted to your instrument and correctly placed. It should stand perpendicular to the cello top, and there should be no space between any part of the bridge’s feet and the top surface. If there is some space, it is not at the right angle.
Caring for Your Bridge
The bridge will move as the tension releases whenever you change your strings. To avoid it collapsing, turn all of the pegs a little before entirely releasing one of them to replace a string. Tighten the new strings slowly and regularly check the bridge. You can carefully pull it back towards the tailpiece by holding it between both hands’ thumbs and index fingers. If your bridge is not correctly placed, its shape will warp quickly. Always ask your cello maker to check the placement and quality of the bridge. It’s not cheap to have a new one made; you can expect to pay $100 – $200 for the high-quality maple and luthier’s time.
Strings
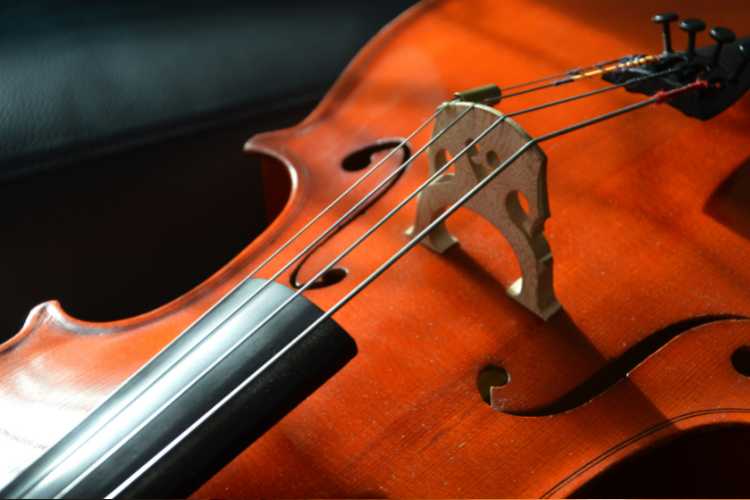 The cello has 4 strings suspended above the fingerboard. These are the C, G, D, and A strings from lowest to highest pitch. A small, metal ball at one end of each string fits into a corresponding hole in the tailpiece. The other end is inserted into the hole in the corresponding peg. Watch this video to see how to do this!
Modern strings come in various metals, mainly aluminum, titanium, and chromium. Their prices and quality vary. D’Addario Prelude strings are among the cheapest on the market, while Larsen and Pirastro are brands favoured by professionals.
Caring for Your Strings
On average, cello strings should be changed once a year. If you play intensively on a daily basis, you might need to replace them every 6-8 months. Wipe the strings clean of rosin dust every time you finish playing, and make sure that each one is correctly wound around the peg. Try to turn them as slowly and smoothly as possible when you tune.
Tailpiece
The tailpiece secures the four strings and ensures that they remain taut. It is traditionally made from ebony, although there are lighter designs nowadays in carbon fiber and resin. Beginner cellos may have plastic tailpieces. It is suspended over the cello’s top: the strings pull the tailpiece upwards towards the bridge while the tailgut pulls it towards the bottom of the cello. The tailpiece usually includes four fine tuners, one for each string. The downside of fine tuners is their additional weight – they can make a tailpiece weigh 125g instead of a mere 25g. Because fine tuners are much more practical than pegs, many players opt for an exceptionally light tailpiece to balance out the weight.
Caring for Your Tailpiece
If you use fine tuners, make sure they are never screwed too tightly or touch the cello top. If any part of the tailpiece touches the top, it may cause a buzz. The tailpiece should be correctly aligned with the bridge and fingerboard. Skewed alignment (due to too much tailpiece weight) may dampen the sound of the cello.
Tailgut
 The tailgut is a small and sturdy cord that attaches the tailpiece to the endpin collar. The material of the tailgut can significantly influence the overall sound of the cello. Wire or metal tailguts wound in the fabric allow a ‘loop’ to form between the C string and the A string, creating richer harmonics. Some cellists still use gut as they find it adds brilliance to the sound. However, gut is more likely to break than plastic or wire alternatives.
Caring for Your Tailgut
Like the tailpiece, any contact between the cello top and tailgut might cause the instrument to buzz. If this happens, you can fit a thin piece of felt under the tailgut.
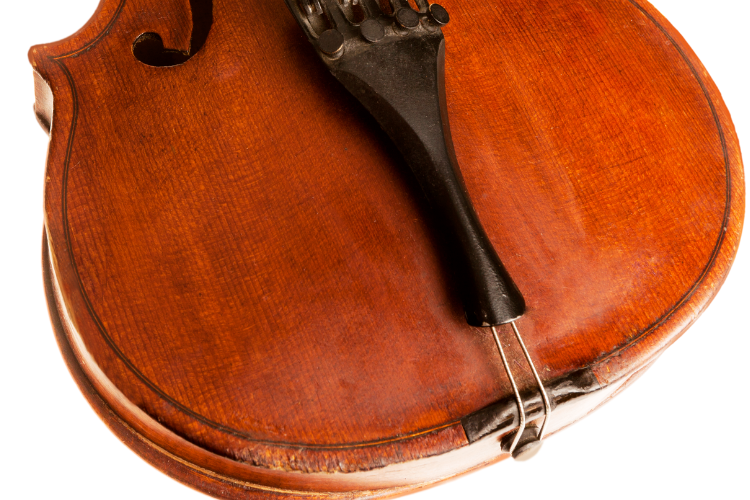
Saddle
The saddle is a small strip of wood, similar to the nut. It is slightly raised above the cello top, allowing the tailgut to loop over the endpin collar without touching the top. The exact height of the saddle varies and can impact the amount of pressure applied by the strings on the bridge. The saddle is inserted into the purfling at the bottom centre of the cello top.
Endpin Collar
The endpin collar, also known as a bottom block, is a circular piece of wood that fits into a hole at the bottom of the cello. The tailgut is looped over the collar, and the spike extends out of it. A thumbscrew on the collar allows the player to extend and retract the spike and fix it at whichever length is required. When retracted, the spike passes through the hole and is stored inside the cello body.
Spike
 Also known as the endpin rod, this is a long piece of metal that extends from the bottom of the cello to the floor, supporting the instrument’s weight as it is played. Spikes are usually made of steel, aluminum, or carbon fiber, and their length is adjustable thanks to the thumbscrew. Modern spikes can have plastic or cork sleeves on the tip that provide extra friction with the floor surface. Spikes come in different diameters: 8mm or 10mm. The endpin collar and hole in the cello are designed for a specific spike diameter. If you want to change your spike, you must ensure that it will fit your cello. 10 mm are the most commonplace for both steel and carbon fiber designs.
FAQs
Question: Are Cello Parts the Same as the Violin, Viola, or Double Bass Parts?
Answer: There are many similarities between all four members of the string family! The size and specific dimensions of each instrument are different. The inside of the bodies is similar, as are the neck and scroll. The setups vary more so: violins and violas do not have spikes or collars but do have chinrests.
Question: Are Carbon Fibre Cellos Good?
Answer: Carbon fiber cellos are increasing in popularity as they are less susceptible to changes in temperature and humidity. They are more suitable for amplification and better adapted to plane travel. That said, wooden cellos are a fixture in the classical music world. If you play other genres of music, a carbon fiber instrument may be more suitable.
Question: Which is the Most Expensive Cello in the World?
Answer: The “Duport” cello by Antonio Stradivari, which sold for 20 million dollars in 2008. The cello was made in 1711 and famously has a small dent from when Napoleon Bonaparte tried to play it in 1812 and accidentally kicked it with his boot.
Question: What are the Parts of a Cello Bow?
Answer: A great deal can be written about bows and their parts (link), as they can about cellos. Here is a summary:
- Bow stick: the long wooden part
- Bow hair: the white or black horsehair parallel to the stick
- Head: The wooden end of the bow
- Tip: the white triangular part of the head, to which the horsehair is attached
- Frog: the ebony part of the bow where it is held
- Screw: the metal end of the bow, which turns to increase/decrease tension
- Winding pad: the small piece of material on the bow stick, near the frog
- Pastille: the centre of the frog, often a mother of pearl circle
Question: Why is my Cello Buzzing?
Answer: There are (unfortunately) many reasons why a cello may buzz. To identify where the unpleasant sound is coming from exactly, ask someone to play your cello (arco and pizzicato). At the same time, put your ear to different parts of the instrument. Here are some commonplace problems that cause buzzing:
- Pegbox: an excess of string-end poking through a peg-hole or a loose peg
- Bridge: the feet of the bridge not being in complete contact with the cello top, or an incorrect position of the bridge
- Strings: old or faulty strings can cause a metallic buzz. A frayed string can vibrate against the fingerboard, causing a slight buzz.
- Body: if the buzz is coming from an area on the cello’s body, there may be an open seam, loose purfling, or a crack. Take the cello to a luthier to diagnose this properly.
- Tailpiece: any contact between the tailpiece and the top or fine tuners and the top.
- Tailgut: contact between the end of the tailgut and the underside of the tailpiece. Or between the tailgut and the cello top.
- Spike: a loose spike sleeve or endpin collar.
Looking for more interesting readings? Check out: